Raspberry Pi 2 Bare Metal Multicore JTAG Debugging
To get going with multicore development and JTAG debugging, these code snippets and pieces of information should be useful.
###1. JTAG debugging
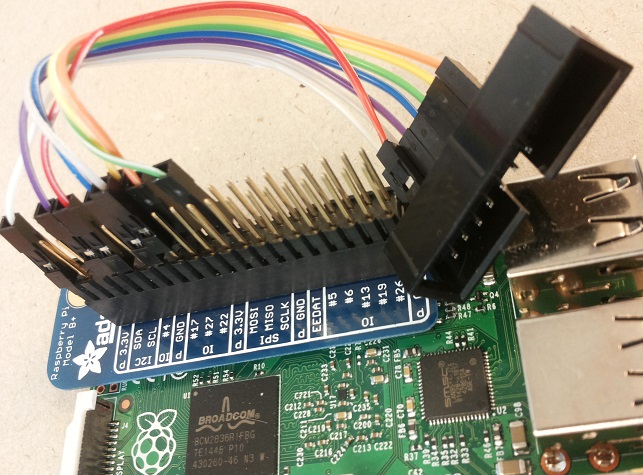
To enable JTAG on Raspberry Pi 2, some of the GPIO pins needs to be configured to their “alternate” function. Create a small application that calls the function below. Build the application, and place the kernel.img file on the SD-card. Now, when the Raspberry Pi 2 boots, JTAG pins will be enabled.
/*--------------------------------------------------*/
static void jtag_enable(void)
{
    // http://sysprogs.com/VisualKernel/tutorials/raspberry/jtagsetup/
    /* -------- JTAG SETUP --------
    JTAG pin    JTAG sig    GPIO        Header pin
    1           VREF        N/A         1
    3           nTRST       GPIO22      15
    4           GND         N/A         9
    5           TDI         GPIO4       7
    7           TMS         GPIO27      13
    9           TCK         GPIO25      22
    11          RTCK        GPIO23      16
    13          TDO         GPIO24      18
    -------------------------------*/

    GPFSEL2_bit.FSEL22 = GPFSEL_ALT4;   // nTRST
    GPFSEL0_bit.FSEL4  = GPFSEL_ALT5;   // TDI
    GPFSEL2_bit.FSEL27 = GPFSEL_ALT4;   // TMS
    GPFSEL2_bit.FSEL25 = GPFSEL_ALT4;   // TCK
    GPFSEL2_bit.FSEL23 = GPFSEL_ALT4;   // RTCK
    GPFSEL2_bit.FSEL24 = GPFSEL_ALT4;   // TDO
}
2. Multicore JTAG debugging
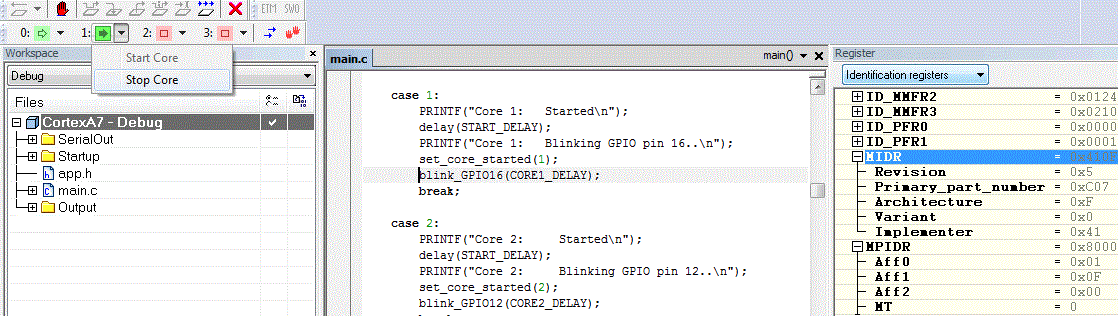
To get in contact with all 4 CPU cores, write the following in a bcm2836.ProbeConfig file:
"A7_0" "Cortex-A7:0@0x80010000"
+"A7_1" "Cortex-A7:0@0x80012000"
+"A7_2" "Cortex-A7:0@0x80014000"
+"A7_3" "Cortex-A7:0@0x80016000"
Specify the ProbeConfig file on: Project > Options > I-jet > JTAG/SWD > Probe configuration file.
Enable Multicore with: Project > Options > Debugger > Multicore > Number of cores : 4.
The Debug Log should say:
Connecting on DAP APB-AP port 0 to core Cortex-A7 r0p5 at 0x80010000.
Connecting on DAP APB-AP port 0 to core Cortex-A7 r0p5 at 0x80012000.
Connecting on DAP APB-AP port 0 to core Cortex-A7 r0p5 at 0x80014000.
Connecting on DAP APB-AP port 0 to core Cortex-A7 r0p5 at 0x80016000.
3. Multicore coding
To enable a specific core, use the function below:
#define CORE0_MBOX3_SET             0x4000008C

static void core_enable(uint32_t core, uint32_t addr)
{
    // http://www.raspberrypi.org/forums/viewtopic.php?f=72&t=98904&start=25
    volatile uint32_t *p;
    p = (uint32_t*)(CORE0_MBOX3_SET + 0x10 * core);

    *p = addr;
}
For example, to enable all CPU cores and make them start at address 0x8000:
core_enable(1, 0x8000);
core_enable(2, 0x8000);
core_enable(3, 0x8000);
Another nice function to have is get_core_id:
uint32_t get_core_id(void)
{
    uint32_t core_id;
    asm volatile ("mrc p15, 0, %0, c0, c0,  5" : "=r" (core_id));
    return core_id & 0x3;
}
With this function, the running code can detect on which CPU core it is executing. This is useful for a switch-case, like this for example:
volatile uint32_t core_id = get_core_id();

switch (core_id) {
case 0:
    // Code for Core 0
    core_enable(1, 0x8000);
    core_enable(2, 0x8000);
    core_enable(3, 0x8000);
    break;
case 1:
    // Code for Core 1
    break;
case 2:
    // Code for Core 2
    break;
case 3:
    // Code for Core 3
    break;
default:
    while (1) {}
    break;
}